Interventional ultrasound: four technical routes to making the needle visible
Interventional ultrasound has exactly one core problem to solve: can you see the needle on the screen. Around that single question our product line actually offers four different approaches — draw a guide line on the screen, enhance the needle tip, calculate the needle position from a magnetic field, or hold the needle at a fixed angle with a bracket. The four differ completely in freedom, difficulty of operation and price, so lumping them together as "puncture guidance supported" tells you nothing. This page separates the four routes and states what each of them cannot do.
Four constraints to clear before choosing interventional equipment
The order cannot be reversed: first settle how the needle will be seen, then talk about which probe.
The needle is metal, but it is also a mirror
A puncture needle is not always clear on ultrasound: with too oblique an entry angle, the beam hitting the shaft is reflected in another direction and the needle breaks into segments or disappears from the screen. Everything called "puncture guidance" is essentially solving this one problem — some by drawing a line in software, some by enhancing the echo, some by computing position from a magnetic field.
Targets sit at very different depths
Superficial lymph nodes and thyroid nodules lie at 20–40 mm; abdominal organs and deeper lesions at 60–100 mm. This directly determines probe frequency: a high-frequency linear array is shallow and fine, a low-frequency convex array is deep and coarse. Whether the right probe exists on a given device matters more than whether it has a "puncture function".
The hand must be steady, and free
During a puncture one hand holds the probe and one advances the needle, so the screen has to sit where the eye never leaves the puncture site. A probe that is the whole system, with the image on a tablet, has a real advantage here: the screen can be placed separately, with no cart attached.
Sterility and consumables are a separate line
Sterilisation and replacement routines for probe covers, puncture brackets and coupling gel have nothing to do with device specifications, yet they decide whether the configuration can actually run in an interventional suite. List the consumables together with the purchase, not after installation.
Four technical routes: all called "guidance", entirely different in method
The wording in the table below is taken verbatim from our published parameter tables, so each model can be checked against it.
| Technical route | Representative models | Wording in the parameter table |
|---|---|---|
| ① In-plane / out-of-plane guide line | 5P, 7H, 8H, 8S, 5PA, 6PA | In-plane puncture guide line; out-of-plane puncture guidance and automatic vessel measurement |
| ② Needle-tip echo enhancement | 5W, 5LP, 5LPA, 5T, 6CPL, 6N | On top of ①, one additional needle-tip enhancement function |
| ③ Magnetic navigation | 6X | Magnetic navigation display of needle displacement and angle; a built-in magnetic sensor acquires the ambient magnetic field vector and the field vector produced by the magnetised puncture needle |
| ④ Puncture bracket (accessory) | 9114 ultrasound probe puncture bracket | For biopsy sampling; an accessory product, to be used together with the matching main unit / probe |
The difference between the four routes comes down to how free the needle is. Route ① draws a predicted line on the screen in software; the needle can go in and out freely, but the line is only a reference — if the needle bends or drifts, the line does not follow. Route ② strengthens the needle-tip echo on top of ①, making the tip brighter in the image, and the judgement is still made by eye. Route ③ computes needle displacement and angle in real time from a magnetic field; the parameter table's own wording is that it "achieves visualisation of the puncture needle in multiple orientations with cross-validation, for greater assurance", and it explicitly states that it works "without relying on a puncture bracket, which makes the operation simpler". Route ④ does the opposite: a mechanical structure holds the needle at one angle, with greater stability and the least freedom.
So the selection question should not be "does it support puncture guidance" but rather: do you want freedom, or stability. If the angle has to be adjusted to the lesion position at any moment, choose among ①②③; if a fixed angle is used for repeated sampling, take ④. The two do not conflict either — the bracket in ④ can be mounted on a probe that already has ①②③.
One point about ④ has to be quoted exactly as it stands in the library: the ultrasound probe puncture bracket is an accessory product and must be used with the matching main unit / probe; the specific compatible models and specifications must be confirmed with our product department. We do not publish a compatibility list, so no configuration table should ever state flatly that "model X fits probe Y".
Three common set-ups, chosen by how the needle is seen
The three tiers correspond to three guidance methods — not a ranking from worse to more expensive.
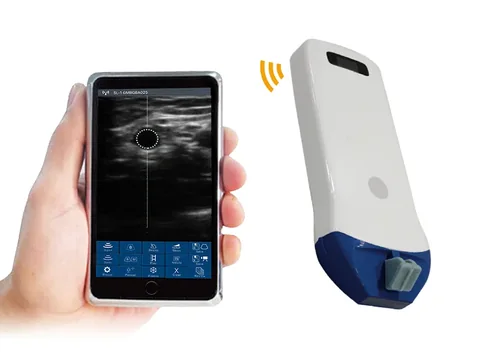
Tier one · 5P: guide line only
Biopsy localisation and catheter placement for superficial targets, with the operator controlling the angle. Representative model 5P high-frequency linear wireless probe: 10.0–14.0 MHz, depth 20 / 30 / 40 / 55 mm, in-plane puncture guide line plus out-of-plane puncture guidance and automatic vessel measurement, with length, angle, area/circumference, trace and area ratio among the measurements.
Trade-off: ideal for superficial targets around 25 mm, and beyond 55 mm it is out of its range. The guide line is a reference line — if the needle drifts, the line does not drift with it, and that has to be made clear in training.
See this model's specifications →
Tier two · 6X: position from a magnetic field
For when needle displacement and angle have to be visible on screen but a bracket must not restrict the angle. Representative model 6X linear probe with magnetic navigation: 7.5–10.0 MHz, depth 20–100 mm, 192 elements and 32 channels, scan width 40 mm, magnetic navigation display of needle displacement and angle, 3 hours of battery life, 200 g.
Trade-off: among these models it is the one that specifically addresses "needle position computed from a magnetic field", and the parameter table's wording is that it works "without relying on a puncture bracket, which makes the operation simpler". A magnetised puncture needle is the precondition; how the consumables are supplied has to be confirmed separately.
See this model's specifications →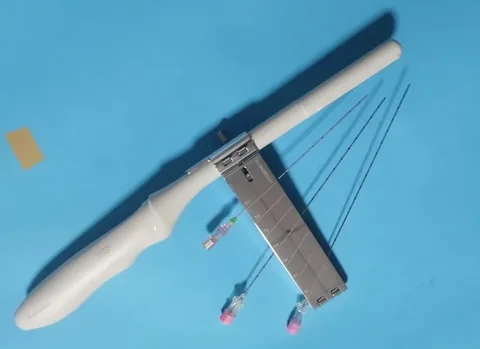
Tier three · puncture bracket: fixed angle
Repeated sampling at the same angle and the same depth, where stability comes first. The ultrasound probe puncture bracket is an accessory product intended for biopsy sampling and must be used with the matching main unit / probe; the main units offer this route as well — the C300 can be fitted with a probe puncture guide device with an adjustable guide line angle, the C5T lists a probe puncture bracket among its options, and the C10 states that every probe can be fitted with a puncture guide device.
Trade-off: more stable and less tiring on the hand, but the needle angle is fixed by the structure, so a change in lesion position means changing the bracket or the angle. We do not publish a compatibility list, so it must be confirmed with the product department.
See this accessory →There is also a middle route: needle-tip echo enhancement. Six models on this site — 5W (7.5–10.0 MHz, 20 / 40 / 60 mm, 256 elements), 5LP (linear 7.5–10.0 plus high-frequency linear 10.0–12.0 MHz, 20–80 mm), 5LPA (phased array 3.3–3.6 plus linear 7.5–10.0 MHz), 5T (intracavity 6.6–8.0 MHz, 20–100 mm), 6CPL (three-in-one, 3.2–10 MHz) and 6N (10.0–13.2 MHz, 20–60 mm) — each carry one extra line in the "puncture assistance" row of their parameter table: needle-tip echo enhancement.
It does not change how free the needle is; it only makes the tip brighter in the image. For an operator starting out with puncture guidance this is more useful than an extra menu item, and for an experienced operator it saves the few seconds spent hunting for the tip.
Four things that are often overlooked
- Probe covers and gel belong in the workflow. Interventional procedures require sterility, so the probe needs a sterile cover. Once covered, the near field blurs and part of the high-frequency superficial advantage is eaten up — something to think through before choosing an 18 MHz class probe.
- Screen position dictates operating posture. When the probe is the system and the image runs on a tablet, the screen can be placed beside the puncture site on its own; a main unit's monitor can also be swivelled, but room has to be left for the cart. Space is tight in an interventional suite, and this matters more in practice than any specification.
- Battery life has to match "several cases in a row". Wireless probes such as 5P, 7H, 8H and 8S mostly run at around the 1.5 hour level; the 6X is 3 hours. Interventional cases are long with short gaps between them, so running flat means stopping to charge.
- Magnetic navigation has preconditions. The principle of the 6X is written in its parameter table: a built-in magnetic sensor acquires the ambient magnetic field vector and the field vector produced by the magnetised puncture needle, then computes displacement and angle. In other words, the needle has to be magnetisable. The specific requirements for the puncture needle, and whether dedicated consumables are needed, are not published on this site and must be confirmed with the product department.
Four lines that cannot be crossed
This section matters more than every specification above.
- This page is about seeing the needle, not about treatment. Needle biopsy, catheter placement and sampling guidance are diagnosis and access; therapeutic procedures such as injection or release fall within clinical management and are a separate matter from equipment selection, so they are not covered here.
- Bracket compatibility cannot be inferred. The 9114 product page on this site states plainly that the specific compatible models and specifications must be confirmed with our product department. Any statement that "this probe takes that bracket" needs a cross-reference table from the product department first; otherwise it is invention.
- Needle gauge, entry angle and maximum sampling depth are not stated. These three are determined jointly by the bracket model and the probe, and are not published in our parameter tables, so no numerical commitment is made on this page. Actual practice follows the instructions for use and the protocols of the institution concerned.
- One successful guidance is not a diagnosis. Whether a specimen is adequate and what the pathology shows depends on the sampling site, specimen handling and the reading by the pathology department. The device supplies the image evidence of where the needle went; the judgement belongs to the physician.
One further point: interventional procedures involve sterility, anaesthesia, bleeding and infection risk, and must be carried out by a physician with the appropriate qualifications in a facility that meets the relevant standards. This page discusses the logic of selecting devices and accessories; it does not constitute operating instructions of any kind.
Common questions
Q: What actually separates the four guidance methods?
A: How free the needle is, and where the needle position comes from. A guide line is a predicted line drawn on screen by software — the needle is free but the line does not bend with it; needle-tip enhancement makes the tip brighter on that same basis; magnetic navigation computes needle displacement and angle in real time from a magnetic field (6X) and still needs no bracket; a bracket holds the needle at one angle mechanically, most stable and least free.
Q: Does magnetic navigation need a dedicated needle?
A: The precondition stated in the parameter table is a "magnetised puncture needle" — that is, the needle itself has to be magnetisable. The specific requirements for the needle, whether dedicated consumables are needed and how they are supplied are not published on this site and must be confirmed with the product department. This page covers the principle and the "displays displacement and angle" layer only; consumables and cost judgements are outside it.
Q: Is a puncture bracket essential?
A: It depends on how you work. For fixed-angle repeated sampling a bracket is easiest on the hand; to adjust the angle to the lesion at any moment, use a guide line or magnetic navigation. The 9114 is an accessory product and must be used with the matching main unit / probe; compatible models and specifications have to be confirmed with the product department, as we do not publish a compatibility list.
Q: Both 5P and 8H have a guide line — how do I choose?
A: Choose by depth. The 5P is 10.0–14.0 MHz with depths of 20 / 30 / 40 / 55 mm, suited to the shallowest tier, and its measurement set is the most complete (length, angle, area/circumference, trace, area ratio); the 8H is 16.0–20.0 MHz with depths of 10 / 20 / 30 / 40 mm, 192 elements and 64 channels, finer in the near field but shallower. For a target around 55 mm the 5P is the better fit.
Q: How does this page divide the work with the anaesthesia and pain page?
A: That page covers vascular access and nerve blocks — deep veins, nerve plexuses, joint spaces — where the goal is for the needle to arrive accurately; this page covers tissue sampling and access — biopsy, catheter placement, sampling — where the core is seeing the needle. The two may use the same probe, but they discuss different problems.
Related reading
Anaesthesia and pain: in-plane or out-of-plane
Guidance for vascular access and nerve blocks, covered in the most detail on that page.
See the scenario →Musculoskeletal: use depth settings to narrow the field to three models
Judging depth for superficial biopsy follows the same logic as musculoskeletal work.
See the scenario →5P high-frequency linear probe: 10–14 MHz, the most complete measurement set
Length, angle, area/circumference, trace and area ratio — all five are there.
See the specifications →Selection resources: cross-reference tables by region and depth
Take the four-route table from this page with you for internal departmental discussion.
See the resources section →Settle how the needle is seen first, then discuss probes and accessories
The four routes imply very different ways of working. Tell us the procedure type, the target depth and whether a bracket is used, and we can base configuration advice on those three points.
Tell us about your setting See other scenarios →The specifications described here are taken from the parameter tables published on this site. Their scope is reference information based on technical specifications; the content stated in the product registration certificate prevails. For contraindications and precautions, refer to the instructions for use. The product must be operated by a licensed physician with the appropriate qualifications.